
Cell Phone Case - Free Crochet Pattern!
Wednesday, June 9, 2010 2:27 PM
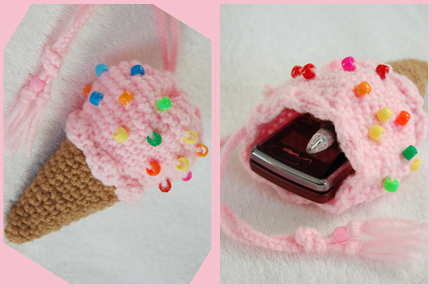
I love this handy little case. I can attach it to my purse or through my belt loop, I use it all the time! Actually I have several different ones that I use all the time.
The pattern is adjustable to whatever size phone you have. You basically want to get the first 3 rows (** the oval shape) to custom fit the bottom of your phone, then continue on from there. It's a very easy pattern!
(click on photos to em-biggen)


Cell Phone Case
Hook size: G - 6, 4.25mm
Yarn: Worsted Weight, #4, (I used Red Heart Acrylic)
Instructions:
Make a chain approximately the width of your phone. (For mine I started with ch 11)
row 1 - sc in 2nd ch from hook & sc in each stitch putting 2 sc in the last stitch (to go around the corner)
row 2 - then sc up the other side, 2 sc in end stitch (to go around the corner)
row 3 - sc along that side.
**(At this point you should have a long flat oval, this is the bottom of the cell phone case and should be approximately the same length & width as the bottom of your phone.)
row 4 - sc in back loops only all the way around (this makes the sides of the case turn upward)
row 5 - sc around
row 6, etc. - sc around
continue crocheting around, to a length about 1/2 inch shorter than your phone.
Leave yarn attached & start flap-
Flap & buttonhole -
At this point you can see the shape of your case and try it on the phone.
Figure where the back will be & leaving 3 stitches on each side for the straps,
single crochet across turning each row until flap is the length you desire.
Buttonhole rows - (my flap was about 8 stitches wide so I did it like this)
1. sc in the next 2 stitches, ch 4 and sc in the last 2 stitches of the row, turn,
2. sc in the next 2 stitches, 4 sc across the loop, sc in last 2 stitches.
Tie off.
Put your phone in the case and line up the buttonhole flap to position your button.
I find a button with a shank works best.
Straps
Attach yarn on one side, sc in next 3 stitches, turn, sc in 3 stitches, turn & continue until strap is desired length.
Attach yarn at other side and sc in next 3 stitches and repeat as for step 1.

Weave in all your ends and you're done!
Add a flower, embroider or appliqué your favorite design, however you want to embellish it. Or leave it plain for a more masculine look.
©2010 - You may sell finished crochet items made from this pattern.
You may not sell the printed or digital pattern itself, or copy or redistribute the pattern in any way for monetary gain.
Thank you.

5 Comments
The pattern is adjustable to whatever size phone you have. You basically want to get the first 3 rows (** the oval shape) to custom fit the bottom of your phone, then continue on from there. It's a very easy pattern!
(click on photos to em-biggen)


Cell Phone Case
Hook size: G - 6, 4.25mm
Yarn: Worsted Weight, #4, (I used Red Heart Acrylic)
Instructions:
Make a chain approximately the width of your phone. (For mine I started with ch 11)
row 1 - sc in 2nd ch from hook & sc in each stitch putting 2 sc in the last stitch (to go around the corner)
row 2 - then sc up the other side, 2 sc in end stitch (to go around the corner)
row 3 - sc along that side.
**(At this point you should have a long flat oval, this is the bottom of the cell phone case and should be approximately the same length & width as the bottom of your phone.)
row 4 - sc in back loops only all the way around (this makes the sides of the case turn upward)
row 5 - sc around
row 6, etc. - sc around
continue crocheting around, to a length about 1/2 inch shorter than your phone.
Leave yarn attached & start flap-
Flap & buttonhole -
At this point you can see the shape of your case and try it on the phone.
Figure where the back will be & leaving 3 stitches on each side for the straps,
single crochet across turning each row until flap is the length you desire.
Buttonhole rows - (my flap was about 8 stitches wide so I did it like this)
1. sc in the next 2 stitches, ch 4 and sc in the last 2 stitches of the row, turn,
2. sc in the next 2 stitches, 4 sc across the loop, sc in last 2 stitches.
Tie off.
Put your phone in the case and line up the buttonhole flap to position your button.
I find a button with a shank works best.
Straps
Attach yarn on one side, sc in next 3 stitches, turn, sc in 3 stitches, turn & continue until strap is desired length.
Attach yarn at other side and sc in next 3 stitches and repeat as for step 1.
Loop end of straps through snap & hook and sew down.

Weave in all your ends and you're done!
Add a flower, embroider or appliqué your favorite design, however you want to embellish it. Or leave it plain for a more masculine look.
©2010 - You may sell finished crochet items made from this pattern.
You may not sell the printed or digital pattern itself, or copy or redistribute the pattern in any way for monetary gain.
Thank you.

Labels: crochet, Free Pattern, Patterns
Baby Dress from Up-Cycled T-Shirt
Tuesday, June 23, 2009 1:57 PM
Here's a dress I whipped up for the baby from an old up-cycled adult sized t-shirt.
(Excuse the horrible pictures, she will not stand still for 2 seconds! Click on the pictures to make them bigger.)

I got the idea, here: Click
Cut the sleeves off a t-shirt at the seams, cut the underarm seam of the sleeve.
Then, cut the t-shirt up the sides and cut apart at the shoulder seams, or if you're lucky or have an older baby, it might be possible to leave the neck and shoulders intact.
If your logo is very large and/or high up on the shirt, you would want to use the diagram I linked to, by having a bodice separate from the skirt to make better use of the logo.
I used a pattern I already had - Simplicity "It's So Easy" pattern # 2684.

and since the t-shirt is stretchy, (the pattern did not call for stretch fabric), I omitted the back seam and button closure and simply cut the back piece on the fold, just like the front.
I used the sleeve pattern and lined up the marking on the pattern piece for hemming the sleeve with the edge of the t-shirt sleeve that was already hemmed! So that made the sleeves a step easier! Then I omitted the elastic for the sleeve. (However, with the already hemmed sleeve edge, I could have easily fed elastic into it. I just didn't want to.)
So basically, all I had to do was
1. sew the front to the back at the side seams and the shoulder seams,
2. gather the top edge of the sleeve, then sew it to the armhole edge,
3. then hem the armhole, neck, and bottom of the dress.
It only took me about an hour!

A cute dress that didn't cost me anything!
5 Comments
(Excuse the horrible pictures, she will not stand still for 2 seconds! Click on the pictures to make them bigger.)

I got the idea, here: Click
Cut the sleeves off a t-shirt at the seams, cut the underarm seam of the sleeve.
Then, cut the t-shirt up the sides and cut apart at the shoulder seams, or if you're lucky or have an older baby, it might be possible to leave the neck and shoulders intact.
If your logo is very large and/or high up on the shirt, you would want to use the diagram I linked to, by having a bodice separate from the skirt to make better use of the logo.
I used a pattern I already had - Simplicity "It's So Easy" pattern # 2684.

and since the t-shirt is stretchy, (the pattern did not call for stretch fabric), I omitted the back seam and button closure and simply cut the back piece on the fold, just like the front.
I used the sleeve pattern and lined up the marking on the pattern piece for hemming the sleeve with the edge of the t-shirt sleeve that was already hemmed! So that made the sleeves a step easier! Then I omitted the elastic for the sleeve. (However, with the already hemmed sleeve edge, I could have easily fed elastic into it. I just didn't want to.)
So basically, all I had to do was
1. sew the front to the back at the side seams and the shoulder seams,
2. gather the top edge of the sleeve, then sew it to the armhole edge,
3. then hem the armhole, neck, and bottom of the dress.
It only took me about an hour!

A cute dress that didn't cost me anything!
Labels: eco friendly, Free Pattern, hand made, Patterns
Bag Pattern
Sunday, June 7, 2009 4:37 PM
Translation for the Fat Bag by Samanta Maragno
_____________________
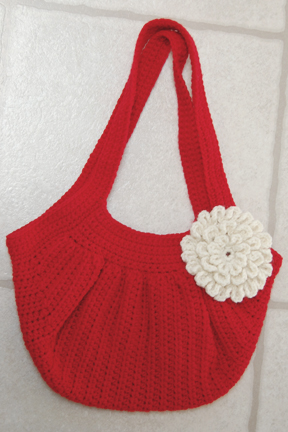
If you make this bag from #4 yarn and an H hook, the bag comes out about 8 inches high & 12 inches across at the widest point.
That's a bit small for me, so the tan bag shown in the pattern I made by adding 6 rows to each end, and 6 rows across the middle. It's about 10 inches high and about 15 inches across at the widest point.
I also made another bag by using 2 strands of #4 yarn held together, and a K hook & by following the pattern, not adding any rows, it came out about the same larger size, 10 x 15 inches.
_____________________
Materials:
H hook & #4 yarn
or
K hook - if you use 2 strands of #4
(thicker yarn & bigger hook will make the bag come out bigger.)
For the smaller purse, I used less than 1 skein of solid color Red Heart Super Saver.
However, the speckled yarn comes in smaller skeins, so you may need just a little more than 1.
For the larger purses I used about 1 1/2 skeins.
For the pattern chart:
click here
(If you right click on the image & save it to your computer & then print it out, it should print out bigger.)
_____________________
Purse Body:
Start with chain 18 and follow according to the chart. It will look kind of curved, like this-
(click on photos to embiggen)

Finished body. It will have a sort of bowl shape-

The little "holes" or gaps along the length every other row, where you chained 2 and turned your row. These are what you're going to crochet into to create the gathering.

If you want to line your bag, you need to do it now. (While lining, I just put a stitch marker through the last stitch so it won't unravel and leave my skein of yarn attached. Why create a break where you have to weave in ends again?)
Fold your bag in half, and fold your fabric in half and cut a square just about even with the length and width of the bag, then hem all 4 edges of the fabric in a rolled hem. You want the entire lining to end up being about half an inch inside all of the edges.
Add a pocket if you want to one side (make sure your pocket opens towards the outer edge.)

Fold lining lengthwise and put into bag (wrong sides together) and whip stitch along the length on each side.

Close up of lining. You want it to be away from the very edge because you're going to need to crochet into those free loops to finish the bag.

Now pleat or gather the lining of the short sides. You want more pleats or gathers toward the center, as this will be the sides and deepest corners of the bag. Whip stitch in place.

OK, lining done. Now on to creating the gather of the bag body. Remember how I left my yarn attached? If you didn't you will have to do it just like you will do the second side of the bag, so I've written the instruction that way. Let's call this the gathering "band", because I can't think of what else to call it!
Band:
~Attach your yarn as close as possible to the end stitch of the long side, chain 1, and now, single chrochet into each "gap" left from the chain 2 turns. You'll be skipping over one row as you go, so kind of squoosh your work towards the next gap as you go. Well, you don't really have to squoosh, but just do not do this row loosely.

At the very last stitch, you may not really see a "gap" but just try to get your last single crochet as close to the very end as possible. It should be 26 single crochets across.

Chain 1, turn, single crochet in each stitch across.
Repeat for a total of 6 to 8 single crochet rows, depending on how wide you want it to look, it's up to you. With thicker yarn I do less rows.
Tie off.
Do the other side of the purse the same way.

Shoulder Straps:
For the shoulder straps, attach yarn where shown.

Single crochet along the short side of purse and up the side of band,
now chain 60 to 80 (depending on how long you want your shoulder strap)
And, being careful not to twist the chain, single crochet it into the other side corner of the same band and single crochet along the short side of purse.
Chain 60 to 80 again for other strap, single crochet it to the other side corner of the same band, single crochet along the side of the band and now you should be back to where you started.

Chain 1, turn, and single crochet all the way around the sides and straps.
Chain 1, turn, and repeat this way for about 4 to 6 rows, however you would like it to look.
There ya go! If you have any questions, leave me a comment & I'll try to help.
P.S. Here is a link to a very similar flower - clicky

Labels: Bend Beanies, crochet, Free Pattern, hand made, Patterns
Bag Give Away
Saturday, June 6, 2009 11:41 PM
No, not mine - Enter to Win a Fabulous Jumeau bag - Click here!
2 Comments
Patterns Coming Soon!
Tuesday, May 12, 2009 12:01 PM
I am working on a Free pattern for you and I'm also trying to translate the directions (from Portuguese!) for this cute bag originally shown here - Click here
Forget trying to translate! Arggh! So I'm sort of winging it, but the Graph for the pattern is here: Graph
I have the bag and the ruffling done, but now I'm going to try to make the shoulder straps. Hopefully this weekend I can get it all written down for you!
UPDATE:
I've done the bag!
(in a hideous shade of Red, because really, I was just practicing!)
I am working on another bag in a color that's easy on the eyes and taking photos for you. I will post it soon.
10 Comments
Forget trying to translate! Arggh! So I'm sort of winging it, but the Graph for the pattern is here: Graph
I have the bag and the ruffling done, but now I'm going to try to make the shoulder straps. Hopefully this weekend I can get it all written down for you!
UPDATE:
I've done the bag!
(in a hideous shade of Red, because really, I was just practicing!)
I am working on another bag in a color that's easy on the eyes and taking photos for you. I will post it soon.
Labels: Bend Beanies, boutique, crochet, hand made, Patterns
Purses from Bend Beanies
Monday, April 27, 2009 7:27 PM
My latest obsession is making silly, little novelty purses. So cute!
Am I too old to carry one? And why?

1 Comments
Am I too old to carry one? And why?

Labels: Bend Beanies, boutique, crochet, hand made
Some of our Adult Sized Hats
Thursday, April 2, 2009 7:47 PM

left: the Boho Beanie - center: Thick yarn Cloche - right: Bella's Twilight Hat
Labels: Bend Beanies, boutique, crochet, hand made, hats
‹Older
 Bend Beanies is a
Crochet Blog where we can
discuss crochet, knitting &
fiber arts. We will also offer
Free Patterns.
Bend Beanies is a
Crochet Blog where we can
discuss crochet, knitting &
fiber arts. We will also offer
Free Patterns.

