Translation for the Fat Bag by Samanta Maragno
_____________________
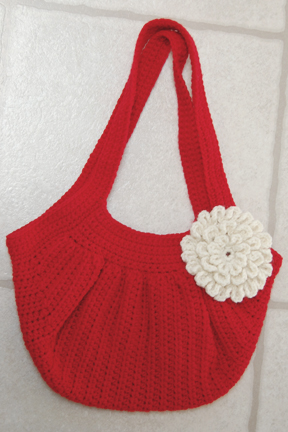
If you make this bag from #4 yarn and an H hook, the bag comes out about 8 inches high & 12 inches across at the widest point.
That's a bit small for me, so the tan bag shown in the pattern I made by adding 6 rows to each end, and 6 rows across the middle. It's about 10 inches high and about 15 inches across at the widest point.
I also made another bag by using 2 strands of #4 yarn held together, and a K hook & by following the pattern, not adding any rows, it came out about the same larger size, 10 x 15 inches.
_____________________
Materials:
H hook & #4 yarn
or
K hook - if you use 2 strands of #4
(thicker yarn & bigger hook will make the bag come out bigger.)
For the smaller purse, I used less than 1 skein of solid color Red Heart Super Saver.
However, the speckled yarn comes in smaller skeins, so you may need just a little more than 1.
For the larger purses I used about 1 1/2 skeins.
For the pattern chart:
click here
(If you right click on the image & save it to your computer & then print it out, it should print out bigger.)
_____________________
Purse Body:
Start with chain 18 and follow according to the chart. It will look kind of curved, like this-
(click on photos to embiggen)

Finished body. It will have a sort of bowl shape-

The little "holes" or gaps along the length every other row, where you chained 2 and turned your row. These are what you're going to crochet into to create the gathering.

If you want to line your bag, you need to do it now. (While lining, I just put a stitch marker through the last stitch so it won't unravel and leave my skein of yarn attached. Why create a break where you have to weave in ends again?)
Fold your bag in half, and fold your fabric in half and cut a square just about even with the length and width of the bag, then hem all 4 edges of the fabric in a rolled hem. You want the entire lining to end up being about half an inch inside all of the edges.
Add a pocket if you want to one side (make sure your pocket opens towards the outer edge.)

Fold lining lengthwise and put into bag (wrong sides together) and whip stitch along the length on each side.

Close up of lining. You want it to be away from the very edge because you're going to need to crochet into those free loops to finish the bag.

Now pleat or gather the lining of the short sides. You want more pleats or gathers toward the center, as this will be the sides and deepest corners of the bag. Whip stitch in place.

OK, lining done. Now on to creating the gather of the bag body. Remember how I left my yarn attached? If you didn't you will have to do it just like you will do the second side of the bag, so I've written the instruction that way. Let's call this the gathering "band", because I can't think of what else to call it!
Band:
~Attach your yarn as close as possible to the end stitch of the long side, chain 1, and now, single chrochet into each "gap" left from the chain 2 turns. You'll be skipping over one row as you go, so kind of squoosh your work towards the next gap as you go. Well, you don't really have to squoosh, but just do not do this row loosely.

At the very last stitch, you may not really see a "gap" but just try to get your last single crochet as close to the very end as possible. It should be 26 single crochets across.

Chain 1, turn, single crochet in each stitch across.
Repeat for a total of 6 to 8 single crochet rows, depending on how wide you want it to look, it's up to you. With thicker yarn I do less rows.
Tie off.
Do the other side of the purse the same way.

Shoulder Straps:
For the shoulder straps, attach yarn where shown.

Single crochet along the short side of purse and up the side of band,
now chain 60 to 80 (depending on how long you want your shoulder strap)
And, being careful not to twist the chain, single crochet it into the other side corner of the same band and single crochet along the short side of purse.
Chain 60 to 80 again for other strap, single crochet it to the other side corner of the same band, single crochet along the side of the band and now you should be back to where you started.

Chain 1, turn, and single crochet all the way around the sides and straps.
Chain 1, turn, and repeat this way for about 4 to 6 rows, however you would like it to look.
There ya go! If you have any questions, leave me a comment & I'll try to help.
P.S. Here is a link to a very similar flower - clicky

Great tutorial! I am almost done with the body of the purse, ran out to get some fabric, for the lining. Thank you for sharing your pattern! It is just beautiful!
ReplyDeleteAnaMaria -
ReplyDeleteI'm so glad you're making the bag!
Hi there. Thank you so much for the pattern.I cant wait to do it this weekend..but i was wondering how many ounce is the skein of the yarn did you use? I would lobe to hear from you..Thanks!
DeleteI agree, great tutorial! I finished my bag last week, although I added some stitches and rows here and there to get the size I wanted.
ReplyDeleteI'm linking you back so anyone who likes my bag knows how to make her own. :-)
Thank you so much for this tutorial! This bag is in my to do list! I only started crocheting this summer, so I don't know if I'm quite up to it yet :)
ReplyDeleteI really love the flower embelishment you made. Is that a free pattern or a pattern one can buy on ravelry.com? Could you point me in its direction? Thanks in advance!!
Alhana -
ReplyDeleteGreat! Yes, it's easy to add rows & make a larger or smaller bag & it still comes out looking pretty much the same.
Thanks and glad you're enjoying it!
Charlotte -
Thanks for noticing the flower. I've tried different flower patterns, but this I came up with by kind of mixing techniques I learned from, I think, 3 different patterns. I was debating on keeping it my little secret, but I think I might put it up in the near future. ;)
This is a beautiful purse and I really look forward to trying it! I too wanted to remark on the flower on the red purse- it's gorgeous. A pattern would be much appreciated!!
ReplyDeletethanks for the great tutorial! i can't wait to get started but there's one thing i'd like to ask, which part of each "end" did you add the rows to make the bag bigger?
ReplyDeletei'm a big bag person so adding more rows is very helpful.
thanks!
Gracey-
ReplyDeleteStart out exactly as the pattern says, same amount of stitches.
On the pattern chart, the increase & decrease "black" symbols are where you add more. Just continue increasing a few more rows. For instance, if you do 5 more rows on the increase end, then you should also add 5 more across the middle. Then by default, you'll add more when you start on the decreasing end.
thank you so much! you're really helpful. i'll let you know how my bag turned out
ReplyDeleteThanks so much for the pattern.
ReplyDeleteThank you so much for this great tutorial. Unfortunately I can't work out the 'decrease' part of the bag. I've tried many times to figure out what's confusing me. I always end up with too many stitches towards the end of the row. Has anyone come across the same pb? Many thanks for any tip that will help me finish it :)
ReplyDeleteAnon-
ReplyDeleteSo, if you got the bag mostly done, when you get ready to decrease, you should have a bunch of rows that you've worked even, 45 hdc across.
So the next row, you do
~ do 1 hdc in each of next 18 stitches
~ then make a decrease hdc over the next 2 stitches
~ do 1 hdc in each of next 5 stitches
~do a decrease hdc over the next 2 stitches
~ do 1 hdc in each of next 18 stitches
chain 2, turn.
Now on the next row, substitute the "18" from the above directions with "17". The row after that "16", and etc.
The numbers correspond with the numbers shown on the chart (I guess I should have written them in on the other end!)
Hope that helps.
Thanks for translating and sharing! I absolutely love this bag! :):):)
ReplyDeleteBless you ! A pattern I can follow easily as I get back into crocheting. Thank you so much for the great tutorial, the photos are wonderful and a big help.
ReplyDeleteThe way you explain how to do it is very clear.....now I am going to make one for sure :)
ReplyDeleteTHANK YOU!
Please please let me have the pattern for the flower!! I just can't wait till this purse is done!
ReplyDeleteThanks
Katrina
Any chance we can get that awesome flower pattern? That would be awesome. please!? Thanks so much for this tutorial. I have made 2 bags so far and plan on making many more. Thanks again!
ReplyDeleteTonya
It is very beautiful pattern of bag.Can i get flower pattern?
ReplyDeleteFlower-
ReplyDeleteHere is a link to a very similar flower-
http://craft-matters.blogspot.com/2009/10/frothy-flower-crochet-pattern.html
Sorry, the flower I made is one of my own patterns and since I am going to start selling patterns I want to keep mine for that.
Here is the pattern for the flowers
ReplyDeletehttp://www.allcrafts.net/f.php?url=web.archive.org/web/20080202082042/http://www.geocities.com/mooncat48/Patterns/PinsandFridgies/Zinneas/zinneas.htm
Enjoy!!!
Well, actually the basic part of the pattern came from that link to the chart, and it was in Portuguese, but for whatever way I have modified it, I have no problem with you selling the finished product.
ReplyDeleteThank you for such great instructions and photos. I love this bag!!
ReplyDeleteLovely bag - and these are really clear instructions. Thanks for linking to my flower pattern.xx
ReplyDeleteThanks! That's a really great flower you have.
ReplyDeletethat was a great tutorial so easy and understandable I made one and got appreciation from my friends.
ReplyDeleteThanks for great tutorial - especially how to do the lining. I love the shaping of the bag.
ReplyDeleteI just printed out this pattern and now I plan to make myself one, as soon as I find the perfect yarn!! thanks so much for sharing the pattern!!!
ReplyDeleteI love this bag and it took me 2 days thanks to you my bag is born. thank you , thank you.....This bag will be my sister's Christmas gift.blueknitter4u@yahoo.com
ReplyDeleteI was wondering if you used a sewing machine to sew the lining on or if you hand sewed it in. Also if you used a sewing machine would you sew it just like you would when doing a lining on a fabric bag? Thanks!
ReplyDeleteRobyn -
ReplyDeleteNo, I hand-sewed the lining into the bag. I'm not brave enough to try and sew through yarn and I don't know if my machine would do it!
However, when preparing the lining, I hemmed the edges and made the pocket on the machine.
If you click on the picture under the paragraph that starts "Close up of lining..." maybe you can see how I whip-stitched it - be sure to stay away from the edge because you still need to crochet the band into those free loops.
If you use freezer paper between the yarn and the pressure foot you can machine are the lining no problem. Photos showing this @ http://anitalite.blogspot.com
DeleteFor those who cannot read a crochet pattern I typed this up. This is the body of the bag:
ReplyDeletech 18, hdc in 3rd ch from hook
4 hdc, hdc increase, 5 hdc, hdc increase, 5 hdc, ch 2 turn
5 hdc, hdc increase, 5 hdc, hdc increase, 6 hdc, ch 2 turn
6 hdc, hdc increase, 5 hdc, hdc increase, 7 hdc, ch 2 turn
7 hdc, hdc increase, 5 hdc, hdc increase, 8 hdc, ch 2 turn
8 hdc, hdc increase, 5 hdc, hdc increase, 9 hdc, ch 2 turn
9 hdc, hdc increase, 5 hdc, hdc increase, 10 hdc, ch 2 turn
10 hdc, hdc increase, 5 hdc, hdc increase, 11 hdc, ch 2 turn
11 hdc, hdc increase, 5 hdc, hdc increase, 12 hdc, ch 2 turn
12 hdc, hdc increase, 5 hdc, hdc increase, 13 hdc, ch 2 turn
13 hdc, hdc increase, 5 hdc, hdc increase, 14 hdc, ch 2 turn
14 hdc, hdc increase, 5 hdc, hdc increase, 15 hdc, ch 2 turn
15 hdc, hdc increase, 5 hdc, hdc increase, 16 hdc, ch 2 turn
16 hdc, hdc increase, 5 hdc, hdc increase, 17 hdc, ch 2 turn
17 hdc, hdc increase, 5 hdc, hdc increase, 18 hdc, ch 2 turn
work 44 hdc adding ch 2 before turn for each row for 24 rows
18 hdc, hdc decrease, 5 hdc, hdc decrease, 17 hdc, ch 2 turn
17 hdc, hdc decrease, 5 hdc, hdc decrease, 16 hdc, ch 2 turn
16 hdc, hdc decrease, 5 hdc, hdc decrease, 15 hdc, ch 2 turn
15 hdc, hdc decrease, 5 hdc, hdc decrease, 14 hdc, ch 2 turn
14 hdc, hdc decrease, 5 hdc, hdc decrease, 13 hdc, ch 2 turn
13 hdc, hdc decrease, 5 hdc, hdc decrease, 12 hdc, ch 2 turn
12 hdc, hdc decrease, 5 hdc, hdc decrease, 11 hdc, ch 2 turn
11 hdc, hdc decrease, 5 hdc, hdc decrease, 10 hdc, ch 2 turn
10 hdc, hdc decrease, 5 hdc, hdc decrease, 9 hdc, ch 2 turn
9 hdc, hdc decrease, 5 hdc, hdc decrease, 8 hdc, ch 2 turn
8 hdc, hdc decrease, 5 hdc, hdc decrease, 7 hdc, ch 2 turn
7 hdc, hdc decrease, 5 hdc, hdc decrease, 6 hdc, ch 2 turn
6 hdc, hdc decrease, 5 hdc, hdc decrease, 5 hdc, ch 2 turn
5 hdc, hdc decrease, 5 hdc, hdc decrease, 4 hdc, ch 2 turn
LaurenMosley-
ReplyDeleteHey THANK YOU! I'm way too lazy to have written that all up!
You are awesome! Great tutorial! Very easy to follow. I am half way through my bag and I can't put it down. Hopefully I will finish it today! Love it! Thanks!
ReplyDeleteShouldn't you credit the original Brazilan designer of this bag, Samanta Maragno?
ReplyDeleteI realize you've translated and added a lot of your own work kto the portuguese language version, but from one designer to another, credit is appreciated.
So sorry, I thought I did credit her, by linking directly to her blog two posts below this.
ReplyDeleteI'll have to redo this current post.
LaurenMosley: Thank you for this translation. I am a beginner and wouldn't be able to follow the chart alone. I do have a question about your instructions though. For the section: work 44 hdc adding ch 2 before turn for each row for 24 rows, shouldn't this be work 45 hdc? I don't know how much this will affect the purse, but my purse is quite small and I don't know if it's because I did 44 hdc instead of 45. Can anyone help??
ReplyDeleteDenice-
ReplyDeleteYes the middle section should be 45 stitches across.
You could try doing some more increase rows before the middle section, (this would make the purse taller)and also add a few rows to the middle section (this would make the purse longer.)
THANK YOU, GOD BLESS YOU!!!
ReplyDeleteOut of curiosity, this is pretty much the fat bottom bag from The Happy Hooker...isn't this violating copyright?
ReplyDeleteI credited where I found the free bag pattern and simply translated it best I could.
ReplyDeleteLots of things look alike, it's the nature of fashion. If you would like an extended discussion on copyright, perhaps you can do that on the Ravelry forums.
OK, I looked up the Happy Hooker bag. It's a similar shape, but uses a different stitch than hdc. I'm not sure what the stitch is but it looks like herringbone.
ReplyDeleteThen, when you go to gather the top of the bag, before making the band, it looks like you would do single crochet decreases to make it gather tighter, then it is sewn onto handles instead of crocheting straps.
So, did I just violate copyright by looking at something?
THANK YOU THANK YOU THANK YOU!! Teaching a friend to crochet and she is doing great..we wanted to try Samanta's pattern together but sadly we do not speak portuguese!! so glad you posted this. I will be starting this as a ravelry project which will post to samanta's pattern but I will link to your translation for others!!
ReplyDeleteHi, this is an awesome pattern, but I'm having some trouble. When I fold the bag in half the side where the increasing and decreasing was done is very curved while the ones in the photo are very sharp. Also my bag looks extremely small, but I am using #4 yarn. Please help. Thank you.
ReplyDeleteHello, I just found this pattern and made it fairly quicky, but I have hit a speed bump! I am totally confused about how to do the straps. In the photo is says to attach the yarn where shown and to me it looks like at the bottom of the band? But then is says to crochet around the short side of the purse and up the band? Does that mean I am supposed to do both bands first, then make straps? Or, do I do one strap/side at a time? Could you please help me out, I need "baby steps" directions. Thank you so much!
ReplyDeleteNevermind, I figured it out and it came out great! I reread the instructions and am just about to finish. Thanks
ReplyDeleteI really love this bag and thank you for your time and generosity in translating it. I do have a question for you. I have also been wanting to felt a bag and wonder what you think about doing it to this bag? Good idea or not? Thanks, Linda
ReplyDeleteThank you for this fantastic pattern =)
ReplyDeleteI'm making this but still have a question, just to make sure. Does the final texture mean to be soft? Because mine feels a little stiff and I'm afraid there maybe difficulty in the gathering process.
(oh and sorry for my poor English)
Thanks for the clear instructions. Any idea how to modify the strap with a wooden handle?
ReplyDeleteI see it's been a while since your original post. Have you ever written up your pattern for the flower? It's so perfect!
ReplyDeleteThank you for tutorial, great pics, I am going to crochet one. Again thanks for sharing :)
ReplyDeleteThank you for this pattern. I have now made 2 bags. One in ww and one in cotton. Color possibilities are endless.
ReplyDeleteYour explanations were so clear.
Wow, I love this bag! Thank you so much for the pattern. I was just wondering how to make it bigger you mentioned like 5rows, does that mean:
ReplyDelete5on each side for the black part in the pattern which means ill add 10 in the original chains
or
5on the increases and decreases stitch only which the red(pink) in the pattern?
And how many ounces of the skein you used? The 7oz. Or 1lb skein?
Sorry.. Hope to hear from you.. Thanks again!
Thank you soooooo much for your effort!!!! The bag is beautiful and the directions simple! See you on Ravelry!
ReplyDeleteI am lining this bag and would like to put in a zipper. Any suggestions?
ReplyDeleteThank you so VERY much for this...it is appreciated and I can't wait to start working on this.
ReplyDeleteE
I am working this bag up and it is very easy and right to the point. I love how you put the pictures because sometimes I don't trust myself to read the pattern and make it like it is suppose to be. Thanks so much for this and I was reading through the comments and most everyone loves it. For those that had any problems with the whole copywrite issue, they just need to deal with it because you didn't do anything wrong. Thanks so much for this and I will try and post some pictures of my finished product and link it to you. Thanks. again.
ReplyDeleteThanks so much LaurenMosley for the written instructions, I can't read charts at all.
ReplyDeleteI there... Thank you so much for the tutorial... I really love it. I did post the pictures of my finished bag in my blog. Thank you again :)
ReplyDeleteThanks for the clear instructions! Cute bag! I know a little girl who is going to love this.
ReplyDeleteI MADE ONE,BUT MY YOUNGEST DAUGHTER (21)SAW IT AND TOOK IT:( SO I AM NOW IT YHE PROCESS OF WHIPPING UP A NEW ONE:)
ReplyDelete